

Many users face the problem of “Quickbooks unable to Export to Excel” information. The reason for this error is that your software cannot detect Excel installed on your system.
Quickbooks unable to Export to Excel problem occurs most often when you upgrade your QuickBooks app. If the update is not successful, you will not be able to export it to Excel, such as a transaction journal or account receivable report or email report as an Excel document.
Infinite customers face the problem of Quickbooks unable to Export to Excel and not allowing their QB software to send data to Excel or QuickBooks. The most plausible explanation behind this rumble is that your product cannot meet the expectations put into your framework.
Reason of QuickBooks Unable to export the report to Excel
- Microsoft Excel files are damaged.
- Your QuickBooks software may be corrupted.
- The file registry is not working properly.
How to Fix Errors of Quickbooks unable to export the excel?
Solution 1:
- Click QuickBooks> Edit> Preferences
- Then Click on Payroll and employees will be selected from the Company Preferences tab
- Press the full payroll option
- Then Create demo staff
- With Paycheck / Paycheck, pay for the demo staff
- Try importing
- If you don’t want to overwrite your existing payroll information, create a new QuickBooks Online account.
Solution 2:
- Close the QuickBooks Desktop
- Create a duplicate of the company file.
- Open the QuickBooks Desktop
- Click on File, and then click on the Open Restore Company option.
- Open the duplicate file you just created.
- When opening the file, try the export process.
Solution 3
- Close the QuickBooks Desktop
- Click on Taskbar> Go to Start Task Manager
- In the Task Manager window, click the Process tab, complete the QBW32.exe process.
- Add HTTP: //*.intuit.com to your browser-trusted sites zone selection
- Click on the gearbox option in the browser Internet Explorer.
- Select Internet options
- Click on the Security tab and then on the Trusted Site icon
- Click on the Sites tab and add HTTP: //*.intuit.com to your list of trusted sites.
- Close
- Then Close the browser too
- Try importing again
Solution 4
- Login to your QuickBooks Online account
- Click on the Gearbox icon> and then go to Company Settings
- Your business information
- is filled in the Contact Information field
- Then Check the legal address, customer address and company address
- Click Save> Done
- And try importing it back into the QuickBooks desktop.
Solution 5
- Log in to the QuickBooks Desktop
- Then Click on the gearbox option from the top right
- Select Company Settings, click Advanced from the left.
- Apply for credit automatically.
- Then Save
Solution 6
- Open Internet Explorer
- Click Internet Options from the Gearbox menu
- Go to the Security tab
- Then Select the Trusted Sites icon
- Enable Safe Mode Option must is not checked
- Set the security level
- Then Click the Site tab
- Close
Quick steps to Export from QuickBooks to Excel
When working with QuickBooks, you can take advantage of the option to export report data to Excel.This functionality is available for most reports in QuickBooks. When you export report data to Excel, You can use Excel to change, filter, or sort the exported data. This allows you to analyze the data Present it in a different way.
Advanced Excel options in QuickBooks. In this article I’m going to show you how to save time with a few simple clicks and tedious and repetitive tasks. (These instructions are for QuickBooks Desktop versions – Enterprise, Premiere and Pro.)
Start by running a report in QuickBooks that you want to export to Excel. then Click Excel and select Create New Worksheet.
Step 1. The Send Report to Excel window appears
- Open a report in QuickBooks
- Then Click on the Excel button (on the Report screen)
- From the drop-down list, select “Create New Worksheet”.
- In the next window that opens, click the “Create a New Workbook” and the “New Workbook” radio button.
- Then Click the Advanced button

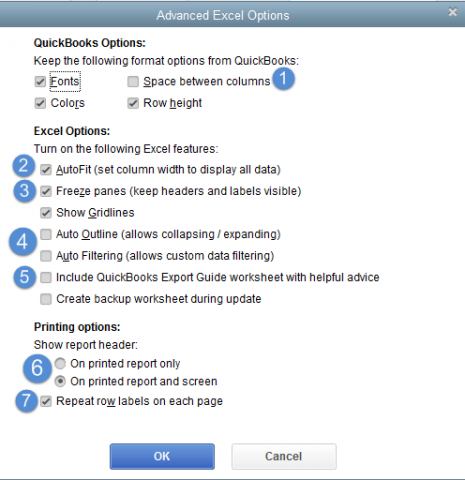
Step 2. The Advanced Excel Options window appears
Here are seven main options – as shown below – and how you can use them:
- Space between columns. How often do you need to delete extra empty columns in Excel? Do not display the box next to the space between the column and annoying columns in your Excel spreadsheet.
- Auto-setting. This allows the width of the column in Excel to display all the data.
- Freeze panes. This makes headings and labels visible in Excel. Great option for working with long reports.
- Auto Outline and Auto Filtering. This is very easy if you want to analyze and sort data in QuickBooks. Auto Outline Allows you to compress and extend the section of the report within Excel.However Auto Filtering allows you to filter data within Excel by selecting from the drop-down list at the top of each column.
- QuickBooks Export Guide. Click on this box so that QuickBooks Excel does not add any additional worksheets with the export prompt.
- Show Report Title option. I am excited to have this facility available. Previously, the report header did not appear in Excel. If you are like me, you could probably export a report and spend a few hours editing it. then You only emailed your employer to report that you forgot to change the title. Your boss is confused and you are embarrassed. Then just Click on the option to show the report and report title printed on the screen and you will not have that problem again.
- Repeat the row label on each page. It automatically sets the row label on each page when printing from Excel. This helps when you have a report that is more than one page long.
- Then Click OK to confirm your choice.
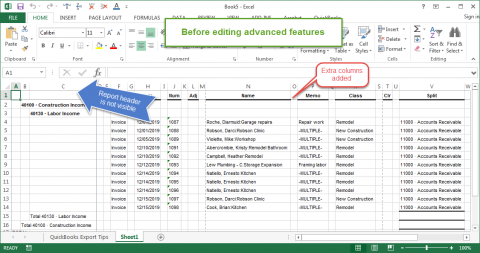
Step 3. Report without the advanced features changed.
Here is an example of a report that you normally export from QuickBooks unless Advanced Export features are changed.
Step 4. Report with advanced export features customized.
In contrast, here is a report on exporting from QuickBooks to Excel after making some changes to Advanced Export Properties.
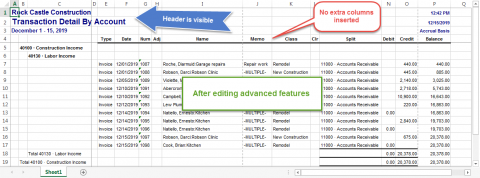
The best thing is that QuickBooks remembers the advanced export options you set, so you don’t have to make the same changes over and over again.
The next time you export from QuickBooks to Excel, remember to use advanced export options. You will see how easy it is and you will be amazed at the time you save.
Export Permits
- Bank Transaction Export
- It sends it to a .csv or .iif document, which you can then export to QuickBooks.
- Export bills: It exports to .csv or .if records and then you can send this document to QuickBooks.
- Date-Book Export: Trades its own special schedule items. In case you need to trade your timetable in another application, click here.
- Then Exporting Contact Notes: Trades the breakdown of all contact notes on the contacts in the clip. QuickBooks Transaction Import.
Export general ledger details from QuickBooks to Excel
- Once in your QuickBooks, from the left navigation bar, click Reports.
- Then Type the General Ledger in the Search field.
- At the top right of the report, click Export and select Export to Export from the options.
- Okay and more
In fact, exporting from Excel to QuickBooks is even easier!
What happens when your data enters QuickBooks Mac?
When your payroll data is transferred to QuickBooks Mac, this process creates a transaction in your bank account register for each payroll service paycheck.
Depending on the number of accounts you choose to receive the discount, bank account transactions may have multiple accounts that affect:
- The partition appears for the split account you specify in Export Preferences.
- A partition for the tax account you specify appears in Export Preferences.
- One or more sections appear on each liability account for federal, state, and local taxes.
- An additional deduction is recorded for each deduction / attire, one for employee reductions and one for any company contribution
When tax payments are exported, they are recorded in the relevant QuickBooks MacTax liability account and reduce liability.
These transactions in QuickBooks Mac accounts update your balance sheet and profit and loss statements.
Export to QuickBooks for Mac
Export payroll data for QuickBooks for Mac and what to do every time you run payroll.
Set up your QuickBooks Mac account for payroll data
If you have not yet set up payroll accounts on QuickBooks Mac, Intuit will set them up to export data to QuickBooks Mac for the first time. Following the instructions in step 3, enter your preferred names on the Export Preferences page.
If your QuickBooks Mac company already has appropriate accounts, you can select accounts directly from your QuickBooks Mac Chart of Accounts. If you need to add an account (perhaps for a new exception), type the name you want in the Account field and they will set up the account the first time you transfer data to your QuickBooks Mac company.
- In the Chart of Accounts, find the bank account name you used to write the payroll check and the expense account for employee pay and employer payroll taxes. Find out which liability accounts you can use for tax and deduction liabilities. (For cash advances and loan repayments, use asset accounts.)
- If you use subcategories or subcategories, use the colon to separate the category name from the subcategory; For example: Payroll: Gross Wages (no before or after colon)
Install quickbooks Mac classes
If you haven’t applied classes yet to your employees on QuickBooks Mac, create them now. Once classes are established, write their names or print out a list of classes and highlight what you use for payroll data.
Set up accounts in your Intuit online payroll account.
You use the Export Preferences page to log in to your QuickBooks Mac accounts. Use the exact names of the QuickBooks Mac accounts you use for payroll data.
- Click on Setup.
- Click Preferences under the Export header.
- From the Software drop-down list, select QuickBooks for Mac.
- In the Checking Account box, enter the bank account name or select from the drop-down list.
- Click Customize to enter an account name, or select it from the drop-down list, as seen on QuickBooks Mac.
- When registering accounts, read the Help topics next to each field to select the correct account type. Generally, enter or select a cost account for wages and tax categories. For liability accounts, enter or select the relevant QuickBooks Mac liability account.
- If using a cash advance or employee loan waiver, enter or select a property account to obtain payroll data
- In case you are using different accounts for different groups of employees, select that option in the Pay / Tax category section, or select separate QuickBooks Mac accounts for each employee.
- If you are using different accounts for different types of pay / tax, select that option in the Pay / Tax category section, or select different QuickBooks Mac accounts for each pay type and tax type.
6. Specify if you are using QuickBooks Mac classes. 7. If classes are selected, you will click on the bottom of this page and enter them on the next page. 8.Click OK.
What you should do after paying paycheck or tax
- Pay or tax as usual.
- Accept your check or payment.
- From the Pay Day tab, click QuickBooks Export.
- Select the checks and payments you want to export.
- If you are exporting for the first time, you will need to select checks and payments from the last six months in advance.
- If you don’t see your checks, change the date range.
- Click Export.
- When you see the confirmation page, click OK.
Freezing issues during export from QuickBooks Online to Desktop
Fix freezing issues when trying to export QuickBooks Online data to a desktop.
Freezing after selecting the “Download” button
Note: In this dialog box it is common for the export company to change the file forever when downloading it. However, we recommend that you save the export company file to your desktop to avoid system-specific permission issues.
- To make sure the file is still downloaded, check the folder where the file was saved.
- Refresh the folder window to see if the KB numbers are increasing.
- If they are, then everything works as designed.
Freezing after selecting the “Change Now” button
- Check if the QBW.TLG file size is increasing.
- After selecting the “Change Now” button, open the folder where the file is saved. Note: To find the file easily: Select the Date Modified column to bring up the list of .QBW files.
- Make sure the QBW.TLG file size is increasing. You will need to refresh every two minutes to see if the window is up.
What if I don’t get a dialog box?
- Minimize all open windows on your computer.
- If you do not see the dialog box, check QuickBooks Online. If you are logged in with inactivity, that means the export is complete.
- Sign in (if needed) or you should automatically see a page that says you have completed the process.
- Scroll down so that you can see it in the lower right corner of the browser window and select Finish.
Additional recommendations
- Although you are generally running on a cash basis, we recommend that you compare profit and loss and balance sheet reports on all dates and on a regular basis.
- These reports do not distinguish between QuickBooks Online and Desktop Paid Views.
- See Export Restrictions for more information.
Hope the description discussed above eliminates all of your questions about this topic Quickbooks unable to Export to Excel. If you experience any problems, you can contact the QuickBooks Payroll Support Number or call +1-877-243-6445