

In this article, we will cover how to pay bills in QuickBooks. We cover two QuickBooks Online Bill Payment options. The first option is to pay bills with checks printed directly from the QBO. Another option is to pay bills online using Bill.com, which is link to QuickBooks Online. Let’s get started.
Why You Should Use QuickBooks Online Bill Payment
QuickBooks Online Bill Payment Service is ideal for businesses that want to determine when and how their bills are paid, but prefer to have a third party process for bill payment. If you have large accounts payable and it is difficult to top up payments on time, then you should use the QuickBooks online bill payment service.
To use the QuickBooks online bill payment service, you must first enter your bills into QuickBooks and then pay using the QuickBooks Online Bill Payment Facility. By paying bills in QuickBooks, your bills are automatically flag as payment, which means they are no longer outstanding. The balance in your account is automatically update to reflect the bill payment. As discussed, Then you can pay the bills by writing a checkbook or by using the Bills.com payment service integrated with QuickBooks.
If you usually pay your bills as soon as they come up against the bill, you don’t want to use the QuickBooks online bill payment facility. Instead, you can write a check in QuickBooks.
Benefits Of QB online Bill Pay
- Pay for any company or person in the United States
- Establish internal business controls to create, review and send payments
- Include invoice and credit memo details along with payment to get proper credit from vendors
- Collect multiple outstanding invoices or bills from one vendor in a single payment
- Automatic entry of transactions into your QuickBooks register means no duplicate when data entry is require to maintain your transaction record
- Simplify your accounts payable, manage your records, and give you more time to focus on your business.
How does QuickBooks Online bill payment work?
In the intuit app center QBO bill pay is an approved app that is approved by Bill.com( one of the top management app ) Bill.com platform ensures secure and fast payment to your vendors.You get some similar services that Bill.com users love. Bill.com offers a variety of services, including receivables and international payments at multiple price levels. QBO Bill Pay is a streamlined version that costs less and focuses solely on paying vendors and suppliers. To use the QBO Bill Pay, you will be ask to create a Bill.com account, but you will only pay for the sorted QBO Bill Pay version. After that, all the tasks in the QBO can be done correctly.
Do Set up
You can sign up for a QBO bill payment by clicking “Learn More” on the alert banner in the Expense window. A new launch page opens where you can click “Start” to start setting up your new bill payment account. There is a very rigorous verification process, you need to verify your identity and have permission to use company bank accounts. Follow all instructions carefully. Once you have confirmed you can set up your account and start filing bills.
Add bills and pay
You can add a bill from the cost window or the Quick Create (+) icon. You can add all the details of the bill as usual, but now you have a new option to pay the bill.
To pay the bill, click the drop-down arrow next to the bill and select “Pay Bill Online”. A new Pay Bill Online window appears where you can determine all details of your payment, such as date, amount, seller’s credit and payment method.
Connect directly to the QuickBooks Desktop
To set up an account, you must apply for online payment services through your bank. Once you are approved, you can connect your bank account to QuickBooks. Then, you can pay your vendor bills directly in QuickBooks.
Inviting vendors / suppliers to accept bank transfers
If you want to pay vendors with an electronic transfer, you must first send them an invitation to receive the transfer from you. Click “Set up Bank Transfer” with the seller’s name to start the invitation. On Bill.com’s vendor network, you can open a search window for that vendor, or you can type in their email to send the invite directly. You will be notified when your vendor accepts the invitation. Until the seller accepts the transfer invitation, you can only pay them by check. To send a large invitation to all your sellers, click “Set up Sellers for Bank Transfer”.
Ways to Distributed your payments
There are two types of payment methods, each with its own delivery time. When you choose “Pay the Bill Online”, you are actually scheduling the payment. You select the amount, payment method, and date of payment, and then click “Submit”. If you have scheduled a payment before 6 PM PST, the payment will start processing on the next banking business day (excluding weekends and holidays). Or you can choose a different future date. Below is a summary of payment types and their delivery schedules.
ACH (Electronic Bank Transfer)
Delivery for the first 5 payments takes 4 days. After that, the payment comes in 2 days. The arrival date will be listed as “Arrival” in the Bill Pay window.
Example: (2 days after first 5 payments)
- 1st day – scheduled payment
- 2nd Day (or Fixed Payment Date) – The money is withdrawn from the bank
- Day 3 – The money seller comes to the bank
When using Check
If they are less than $ 5,000, paper checks will be sent to the USPS via USPS. Estimated date appears in the Bill Pay window as “Estimate. Reach”.
Examples:
- 1st day – scheduled payment
- Day 2 – Funds are withdrawn from the bank. Mail Check
- 3rd day-TBD – Check will be given on expected arrival date. Inuit does not guarantee USPS delivery on any particular day.
Payments of $ 5,000 or more require at least one additional day of processing, so you need such a factor when deciding on large payments. There is no limit to the amount of money you can set for Intuit for day payment; However, you are aware of your bank withdrawal limits to avoid charges for overdrafts.
Pay your vendors using the Pay Bill window
- From the Vendors menu, select Payment Bills.
- Select a bill to pay.
- Set the discounts or credits you want to apply.
- From the Account dropdown, select a checking account with the online vendor payment service.
- From the Method dropdown, select Online Bank PMT.
- Add a reference number or change dates if needed:
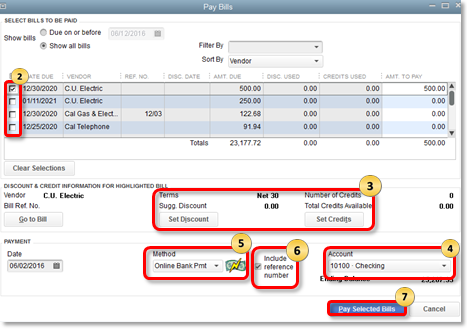
- Select the included reference number. Checkbox if you want to send a bill or credit reference number with your name and account number. If you select this option, the payment will not be sent electronically. The payer will print and mail the check instead.
- Change the date as needed. If your payment processor needs a prime time to prepare a payment, QuickBooks will show you both the due process (the money withdrawn from your account) and the date delivery for the payment. If not, only the payment date.
7. Select salary selected bills to record bill payments. The Payment Summary window opens to show the bills that have been successfully recorded.
A list of payment bank feeds appears in the item to be sent. Payments will not be sent until you go online and choose to send the goods.
How To Pay Bills In QuickBooks Online (QBO) By Check
To pay bills in QuickBooks by check, you complete four steps. First, you navigate to the Pay Bill window. Second, you choose which bills to pay. Third, However you verify all your bill payments in the check register. Fourth, you can print checks directly from QuickBooks to pay bills.
QuickBooks has four steps to pay bills by check:
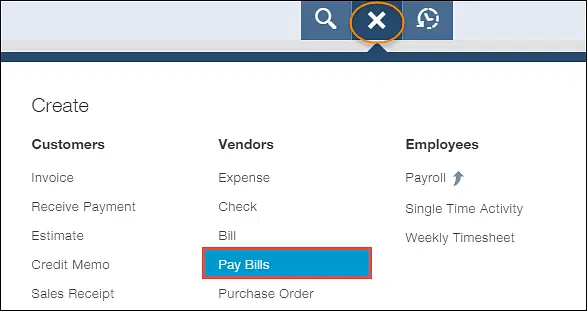
1 Navigate to QuickBooks Online Bill Payment
From your QBO dashboard, click on the plus sign to display the Quick Create menu.
2. Select the Pay Bill option
Then Under the Vendors column, select the Pay Bill option
3. Select bills to pay using online payment
In the first column, place a check mark next to each bill you want to pay by clicking on the box to the left of each bill.
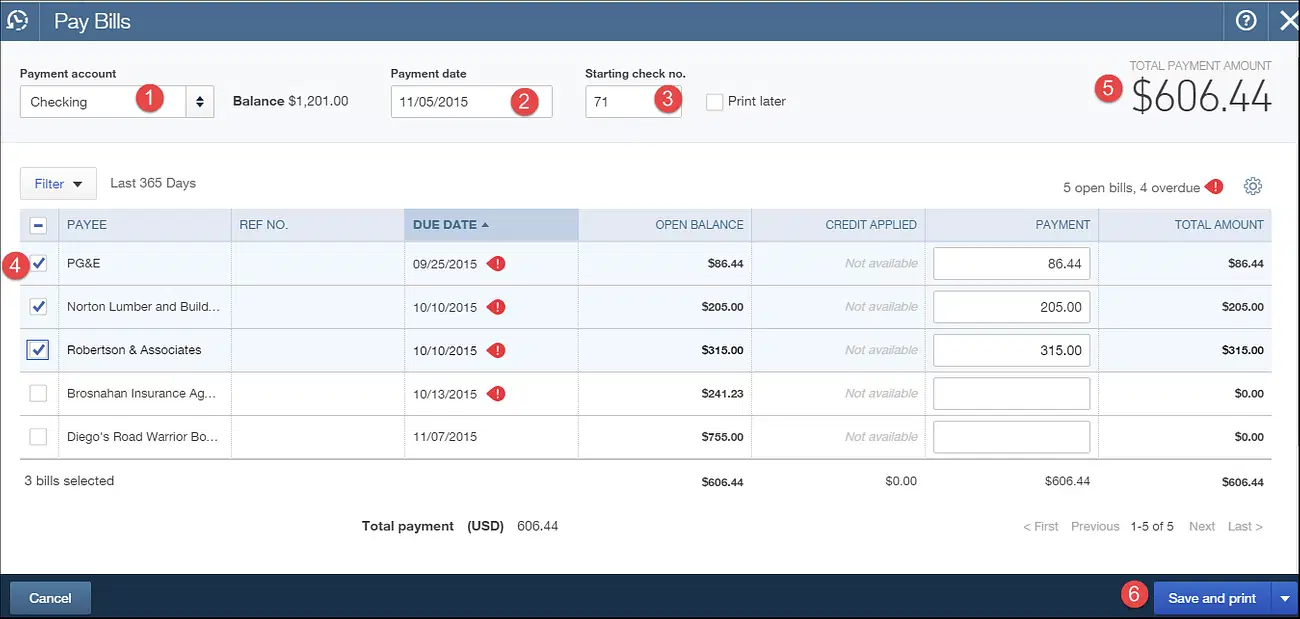
- Select a bank account to post the payment.
- Then Enter the date of printing on the check.
- Enter the initial check number.
- Then Click on the bills you want to pay.
- The total payment amount is the sum of all bills you want to pay.
- Then Click Save and Print.
4. Enter the bill payment amount
When you select bills to be paid, QuickBooks automatically wants to pay you the amount you pay. It pays the sum of money plus the amount to be paid. However, you want to make the payment directly in the entire column of payment.
Once you select a bill, QuickBooks automatically populates the “Payments” column with the amount in the “Open Balance” column.
5. Select the payment processing date for each bill
In the “Processing Date” column, enter the date on which you want to withdraw money from your bank account
6. Select the payment method for each bill
With your Bill.com service, you can choose to send electronic payments (bank transfers) or checks. In addition to the monthly membership fee, a bank transfer will cost you 99 cents and a check of 1.99.
In the “Payment Method” column, you can select Bank Transfer for Check
7. Review and submit bill payment
Review the bills you choose for payment to make sure the amount, process date and payment method is correct. When ready, click the “Review and Submit” button in the lower right corner.
FAQ about How to QuickBooks Online Bill Payment .
How can I ask the seller about online payment?
If you pay vendors online, you can check the status of payments sent to your financial institution (FI) by following these steps:
- Open the paid account register.
- In the register, find out if you want to open a transaction.
- Go to Banking, and then select Bank Feed.
- Select Learn About Bill Payment Online. Note: To add a message to your inquiry, select Add Text Message, and then enter your query or comment on the payment in the Messages section.
An inquiry is underway to send a list of bank feeds. When you go online, it is sent via FI.
What information can an online seller send with payment?
It depends on your FI usage processing service. Your FI may allow you to stream the following items with your online vendor payment:
- The invoice information is sent as a payment voucher
- Detailed Memo
- Discount information related to specific invoice
Contact your FI to find out your options.
How can I cancel an online payment after sending it?
When you pay online, you include a delivery date. Since your FI has not processed the payment until that delivery date, there may be a short period where you can cancel payment instructions after the FI has been sent.
Cancellation of payment instructions means that your FI will not issue electronic payments or checks to the payer. Payment does not stop when the payment has already been processed or the check has already been sent to the payee. In these cases, contact your FI.
Cancellation of online payment after sending:
- Go to Banking, and then select Bank Feed.
- Select Bank Feed Center.
- From the left pane, select the account you set up to pay the bills.
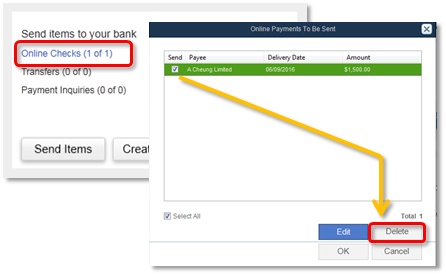
- Send items to your bank branch and select the online check link.
- Select the transaction you want to cancel.
- Select Delete, and then OK.
Cancel item appears to send a list of bank feeds. When you send and receive transactions, it is sent to the FI.
Already have a Bill.com account?
If you already have a Bill.com account, see if Bill Pay is right for you.
- Even with a Bill.com account, you cannot use your current Bill.com account with QuickBooks Online. Learn more about what you need to consider.
- You must sign up for a QuickBooks Online Bill Payment Account. To unlink your current Bill.com account from QuickBooks Online you must cancel your Bill.com account or contact Bill.com.
Once this is done, you can sign up for a bill payment account from QuickBooks Online. Your current Bill.com account is separate from the bill payment
How do I apply a bill payment in QuickBooks?
To pay a bill in QuickBooks, follow these steps:
- First, navigate to the Pay Bill window.
- Second, choose the bill you want to pay.
- Third, enter payment details (e.g., payment method, amount paid and date).
- Fourth, save the payment information.
Which QuickBooks Online editions support bill payment?
All versions of billing records can support online bill payment. These are QuickBooks Online Essentials,QuickBooks For Mac, Plus and Advanced.
Why do my first payments take longer than expected?
When first started with a bill payment service, allow four banking days for both bank transfer and mail check. After five full payments, the payment time will be expedited (for example, a bank transfer of less than 5,000 comes in two banking days).
When will my seller receive my payment?
Depending on the type of payment, your vendor may take up to five banking days to receive the payment.
Is there a daily limit on how much money I can pay this way?
There is no “daily limit” on the amount your seller can pay.
Note: Please keep in mind that your financial institution may have a daily cost limit. However, payments over $ 5,000 take longer to arrive.
Final Note
You have a clear understanding of your options until you pay the bills online at QuickBooks Online. You can pay your own bills and do heavy lifting for yourself by writing a check directly from QuickBooks or signing up for a Bill.com payment service.